Thursday, March 31, 2011
Crystal used my FTU tut Rockin It and here are her results!!!Thanks so much Crystal for sending it to me to show off!! Much Love!!


This tutorial was written for experienced PSP users
Supplies:
Scrap kit by Toxic Desirez called Punk Star 1 here
Template by Punky Butts Productions here
Font is called New Romantics
Artwork by Ismael Rac here
Plug in Eye Candy 6,Xero Fritillary
Open your template
Use papers 2,4,& 21 to transform it
Add Xero Fritillary and Noise to your template
Open your tube
Paste as a new layer
Re size
Position
Add DS
Open and paste these elements along with a drop shadow:
Bead
Bow 2
Charm
Doodle
Chrome skull
Lollipop's
Ribbon 2
Pill
Skull scatter
Skull star
Wire
Scatter 1 & 2
Scatter 1 & 2
Sparkles
Add all © info
Add your name
Eye Candy Glass
Gradient Glow
Add DS
Merge visible
Save as a PNG!

Wednesday, March 30, 2011
So apparently some HATERS have been stalking my blog and reporting me to PSP Tubes Emporium....So I am having to take some tuts off my blog b/c I didn't put the right © info on it,it was a simple mistake.I can redo them but I just don't want to lol.Just wanted to let my followers know what is going on! Much Love!!! Peace ♥
Morning ladies!! There is a new forum out there specially made for blogger gurlz!! Please join us!!
Tuesday, March 29, 2011
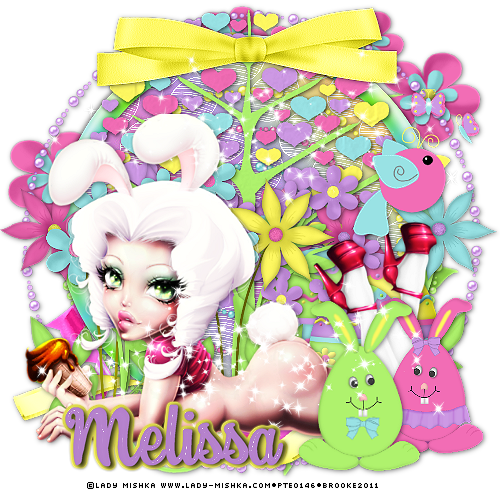
This tutorial was written for experienced PSP users
Supplies:
FTU kit called Bunny Love by Melissa's Inspirations here
Artwork by Lady Mishka here
Font is called Swing Dancer
Plug in is Eye Candy 6
Open a new image 500x500
Open frame 2
Paste as a new layer
Re size
Position
Using magic wand click on the inside of the frame
Expand by 2
Open paper 14
Paste as a new layer
Selections Invert Delete Select None
Add DS to your frame
Open the tube
Paste as a new layer
RE size
Position
Add DS
Paste these elements along with a DS:
Pearls
Pink Ribbon
Bird
Egg 1 2 & 4
Flowers 1 2 3 & 4
Flowers 11 & 12
Bow 3
Tree 1
Girl & Boy Bunny
Ribbon 4
Sparkle
Add all © info
Your name
Eye Candy Glass
Gradient Glow
Merge visible
Save as PNG!
Monday, March 28, 2011

This tutorial was written for experienced PSP users
Supplies:
Scrapt Kit called Teenage Rebel by Toxic Desirez along with
Template 165 here
Artowrk by Very Many at PicsFor Design here
Font is called Tagging Zher1
Plug in Eye Candy 6
Open your template
Delete the © info
Use papers 7,10,15,17,& 21
To transform your temp
Open your tube
Paste as a new layer
Position
Add DS
Open these elements and paste them onto your temp
Add DS to all:
Bow 3
Button Bow
Flames
Locker
Lolli's 1,2,&3
Pill
Toy
Wire
Word Art 2
String
Pencils
Skull 2
Sparkles
Add © info
Add Your name
Eye Candy Glass
Gradient Glow
Add DS
Merge visble
Save as a PNG!
Friday, March 25, 2011

This tutorial was written for experienced PSP users
Supplies:
Scrap Kit called Cute Bunny by Toxic Desirez here
Artwork by Elias Chatzoudis here
Font is Fabulous 50's
Plug in Eye Candy 6
Open a new image 500x500
Open frame
Paste as a new layer
Re size
Position
Click inside with your magic wand
Expand by 10
Open paper 6
Paste as a new layer
Selections Invert Delete Select None
Add DS to your frame
Open your tube
Paste as a new layer
Re size
Erase the bottom of the tube
Add DS
Open these elements and arrange them on your tag
Add DS to all:
Chick and Flowers
Kite
Carrot
Lollipop 1 & 2
Ribbon 2
Easter Hanger
Flower Ribbon(Dup 3X's and arrange on frame)
Sun
Bow 2
Sparkles
Add all ©info
Add your name
Eye Candy Glass
Add DS
Add Gradient Glow
Merge Visible
Save as a PNG!
Thursday, March 24, 2011

This tutorial was written for experienced PSP users
Supplies:
Scrap kit called Rustic Spring from A Taggers Scrap here
Artwork by Jennifer Janesko here
Font CurleyCue
Mask 147 from Weescotslass Creations here
Plug in Eye Candy 6
Xenofex Constellation (Optional for animation)
Open a new image 500x500
Open frame 6
Paste as a new layer
Re size
Position
Click inside the frame with magic wand
Expand by 2
open paper 16
Paste as a new layer
Selections Invert Delete Select none
Open your closeup
Paste as a new layer
Re size
Position in the frame
Add DS
Apply Luminance(L)
Add these elements along with a drop shadow:
Greenery
Flowers 2,3,&4
Buds
Glitter 1
Diamond scatter
Leaves 2
Bird 2
Log
Butterfly 2
Open paper 9
Paste as a new layer
Apply mask
Merge group
Add © info
Add your name
Eye Candy Glass
Gradient Glow
Add DS
You can animate now if you choose to
If not Merge Visible
Save as a PNG!
Wednesday, March 23, 2011

This tutorial was written for experienced PSP users
Supplies:
Scrap kit called Sexy Grunge by Butterfly Kisses Scraps here
Artwork by Suzanne Woolcott here
Font is Capistrano BF
Plug in Eye Candy 6
Open a new image 500x500
Open frame 5
Paste as a new layer
Re size
Position
Click inside the frame
Expand by 2
Open paper 19
Paste as a new layer
Selections Invert Delete Select None
Add DS to your frame
Open the tube
Paste as a new layer
Re size
Position
Add DS
Open and paste these elements
Add DS to all
Bow 1
Daisy 1 & 2
Deco 2
Flower 2
Heart
Ribbon3
Ribbon 2
Add all © info
Add your name
Eye candy Glass
Gradient Glow
Add DS
Merge visible
Save as a PNG!

This tutorial was written for experienced PSP users
Supplies:
Scrap kit by Toxic Desirez called Emo Cutie here
Art work by Very Many here
Font is Fraktur BT
Plug in Eye Candy 6
Open a new image 500x500
Open frame 2
Paste as a new layer
Re size
Click inside the frame with your magic wand
Expand by 2
Open paper 11
Paste as a new layer
Selections Invert Delete
Select None
Add DS to your frame
Open your tube
Paste as a new layer
Re size
Position
Add DS
Erase the bottom of the tube
Open and paste these elements:
Add DS To all:
Bomb
Background
Wordart
Bow 2
Bottle
Canes 1 & 2
Divider
Lips 2
Dragonfly Sparkle
Ribbon 1
Splatter 1 & 2
Sparkle
Add © info
Add your name
I used a gradient for my color
Eye Candy Glass
Gradient Glow
Add DS
Merge visible
Save as a PNG!
Monday, March 21, 2011

This tutorial was written for experienced PSP users
Supplies:
Scrap kit by Creative Scraps By Crys called Nighttime here
Font is called Capistrano BF (PTU)
Mask unknown where I got this
Plug in Eye Candy 6
Open a new image 500x500
Open the bed
Paste as a new layer
Re size
Position
Open girl
Paste as a new layer
Re size
Position on the bed
Add DS
Open the window
Paste as a new layer
Re size
Position
Add DS
Open the twinkling stars
Paste as a new layer
Re size
Position
Open the toy box
Paste as a new layer
Re size
Position
Add DS
Open the clock
Paste as a new layer
Re size
Position on the chest
Add DS
Open 3 balloons
Paste as a new layer
Re size
Position Add DS
Open the hat
Paste as a new layer
Re size
Position on the girl
Add DSOpen the bubble
Paste as a new layer
Re size
Position
Add DS
Duplicate 2 X's
Position
Open moon dust
Paste as a new layer
Re size
Position
Add DS
Open moon flowers
Paste as a new layer
Re size
Position
Add DS
Open sheep 2
Paste as a new layer
Re size
Position
Add DS
Duplicate 2x's
Arrange
Open stuffed bunny
Paste as a new layer
Re size
Position
Add DS
Open teddy
Paste as a new layer
Re size
Position
Add DS
Open ribbon
Paste as a new layer
Re size
Position
Add DS
Open paper 11
Paste as a new layer
Apply mask
Merge group
Add any © info
Add your name
Eye candy Glass
Gradient Glow
Add DS
Merge visible
Save as a PNG!

This tutorial was written for experienced PSP users
Supplies:
Scrap kit called Days Gone By by Creative Scraps by Crys here
Artowrk by Myka Jelina here She is now independent
Template by Crys here
Font is MAWNS Handwriting
Plug in Eye Candy 6
Open the temp
Delete the © layer
Delete the key and hands
Use papers 8,12, & 7 for the rect,square, and circle
Add DS
to these layers
Add Eye Candy Glass and Gradient Glow to the word art
Add DS to all all your temp layers
Open your tube
Paste as a new layer
Position
Add DS
Place these elements down all w/DS:
Balloon
Butterfly 2
Boots
Watch 2
Leaves
Goggles
Umbrella
Key
Open paper 4
Paste as a new layer
Apply mask
Merge group
Add all © info
Add your name
Eye Candy Glass
Gradient Glow
Add DS
Merge Visible
Save as a PNG!


This tutorial was written for experienced PSP users
Supplies:
Scrap kit by Pimp'd Designz called Tinkled Pink here
Artwork by Lady Mishka here
Font is LDJ Jilly Nilly
Mask 116 from Weescotslass Creations
Plug in Eye Candy 6
Open a new image 500x500
Open frame 1
Paste as a new layer
Re size
Position
Click inside with your magic wand
Expand by 2
Open paper 2
Paste as a new layer
Selections Invert Delete Select none
Add DS to your frame
Open your tube
Paste as a new layer
Re size
Position
Add DS
Open and paste these elements along with a drop shadow:
Hearts
Butterfly
Brackets 1 & 2
Border
Floral
Flower 1 & 2
Print
Ribbon 3
Ribbon 1
Add all © info
Add your name
Eye candy Glass
Gradient glow
Add DS
Open paper 9
Paste as a new layer
Apply mask
Merge group
Merge visible
Save as a PNG!!

This tutorial was written for experienced PSP users
Supplies:
Scrap kit called Peachy Keen by A Taggers Scrap here
Artwork by Jennifer Janesko,I purchased this when CILM was open
Now you can purchase from CDO
Font is LHF Bounce Script
Mask I can't remember where it came from :)
Plug in Eye Candy 6
Open a new image 500x500
Open frame 3
Paste as a new layer
Re size
Click inside using your magic wand
Expand by 2
Open paper 1
Paste as a new layer
Selections Invert Delete Select None
Add DS to your frame
Open your tube
Paste as a new layer
Position
Click inside your frame with your magic wand
Expand by 2
Click your tube
Selections Invert Delete
Select None
Move this below your frame layer
Add DS
Arrange these elements on your frame
Add DS to all
Flowers
Flowers 2
Bike
Berry
Beads
Deco 4
Teddy
Open Paper 14
Paste as a new layer
Apply a Mask
Merge group
Add © info
Add your name
Eye Candy 6 Glass
Gradient Glow
Add DS
Merge visible
Save as a PNG!

The aim of the award is to
bring recognition to blogs with minimal followers. Since we have accepted the
award we must pass it on to at least 3 other blogs (but not more than 5), that
have inspired us and we feel deserve a bit more attention. The rules are to say
thank you on our blog to the one who passed it on to us
and link to their blog (see above). Pick the blogs to pass the
award on to, leave a note on their blog and then list them with links to their
blogs...
So here are the blogs I
chose:
Butterfly Kisses PSP World
Leather and Lace Tuts
Polka Dot Scraps
Thursday, March 17, 2011

This tutorial was written for experienced PSP users
Supplies:
Scrap kit called Teenage Dirtbag by Grunge & Glitter here
Artwork by Simon Han at PSP Tubes Emporium here
Font Inspiration ROB
Mask 289 from Weescotslass Creations here
Plug in Eye Candy 6
Open a new image 500x500
Open frame 4
Paste as a new layer
Re size
Click inside the frame using your magic wand
Expand by 3
Open paper 10
Paste as a new layer
Selections Invert Delete Select None
Add DS to your frame
Open your tube
Paste as a new layer
Re size
Position
Add DS
Open flair
Paste as a new layer
Re size
Position
Add DS
Open foil star
Paste as a new layer
Re size
Position
Add DS
Open flower 1 & 2
Paste as a new layer
Re size
Position
Add DS
Open black glitter
Paste as a new layer
Duplicate 3 X's
Move below paper layer
Arrange
Open guitar
Paste as a new layer
Re size
Position
Add DS
Open the motorcycle
Paste as a new layer
Re size
Position
Add DS
Open ribbon 1
Paste as a new layer
Re size
Flip
Position
Add DS
Open skull 1
Paste as a new layer
Re size
Position
Add DS
Open paper 11
Paste as a new layer
Apply Mask
Merge group
Add ©info
Add your name
Eye candy Glass
Gradient Glow
Add DS
Merge visible
Save as a PNG!
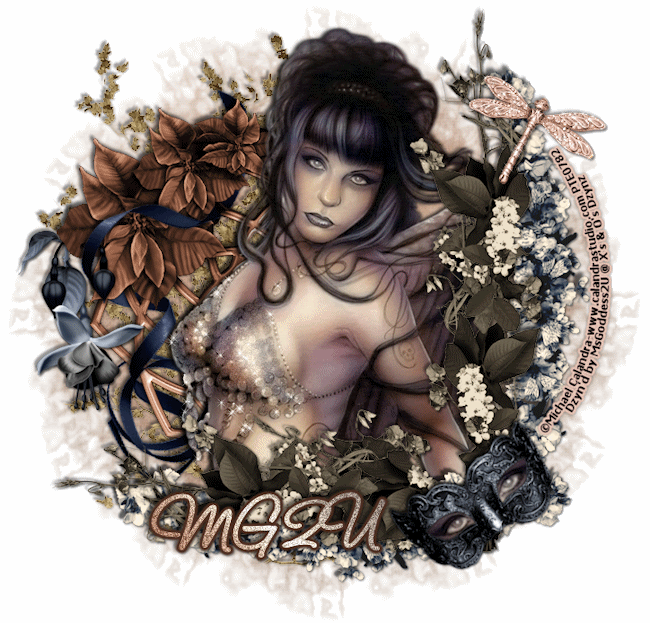
Tuesday, March 15, 2011

This tutorial was written for experienced PSP users
Supplies:
Scrap kit by Toxic Desirez called Kiss My Skull here
Artwork by Robert Alvarado here
Font is MAWNS Handwriting
Plug in Eye Candy 6
Mask 95 from Weescotslass Creations here
New image 500x500
Open frame 1
Paste as a new layer
Re size
Open paper 2
Apply mask
Merge group
Add noise to your mask
Add your tube
Erase the bottom
Add DS
Open the wire
Paste as a new layer
Re size
Position
Add DS
Open the beaded string
Paste as a new layer
Re size
Position on the frame
Add DS
Open bow 1
Paste as a new layer
Re size
Position on the frame
Add DS
Open the barbed heart
Paste as a new layer
Re size
Position
Add DS
Open bunny
Paste as a new layer
Re size
Position
Add DS
Open the flame
Paste as anew layer
Re size
Position behind the frame
Add DS
Duplicate
Mirror
Open lollies 1 & 2
Paste as a new layer
Re size
Position
Add DS
Open the winged skull
Paste as a new layer
Re size
Position
Add DS
Open ribbon
Paste as anew layer
Re size
Position
Add DS
Open glitter
Paste as a new layer
Re size
Position at the bottom
Add DS
Open sparkles
Paste as anew layer
Position on the top
Add all © info
Add your name
Eye candy Glass
Gradient Glow
Add DS
Merge visible
Save as a PNG!

This tutorial was written for experienced PSP users
Supplies:
Scrap kit called Paris by A Taggers Scrap here
Artwork by Elias Chatzoudis here
Font is poplar std
Mask....unsure where I got it from
Plug in Eye Candy 6 Gradient Glow
Open a new image 500x500
Open frame 6
Paste as a new layer
Re size
Rotate
Click inside using your magic wand
Expand by 3
Open paper 4
Paste as a new layer
Selections Invert Delete Select None
Add DS to your frame
Open tube
Paste as a new layer
Add DS
Open branch
Paste as a new layer
Re size
position under the tube
Add DS
Duplicate
Mirror
Arrange
open deobranch
Paste as a new layer
Re size
Rotate
Position on the frame
Add DS
Open leaves 2
Paste as a new layer
Position under the branches
Add DS
Open the tower
Paste as a new layer
Re size
Position
Add DS
Open the flower cart
Paste as a new layer
Re size
Position
Add DS
Open the petals
Paste as a new layer
Re size
Position at the bottom
Add DS
Open the mug
Paste as a new layer
Re size
Position
Add DS
Open the street light
Paste as a new layer
Re size
Position
Add DS
Open the spotlight
Paste as a new layer
Re size
Position on the top
I added my own word art
You may do so if you would like
Open paper 24
Paste as a new layer
Apply mask
Merge group
Add © info
Add your name
Eye Candy 6 Gradient glow
Add DS
Merge visible
Save as a PNG!

This tutorial was written for experiencd PSP users
Supplies:
Scrap kit called Emo from Sinfully Creative Scraps here
Mask 205 from Weescotslass Creations here
Font akaPosse
Plug in Eye Candy 6
Open a new image 500 x500
Open link frame 3
Paste as a new layer
Re size
Click inside the frame using your magic wand
Expand by 3
Open paper 10
Paste as a new layer
Selections Invert Delete Select none
Add DS to your frame
Open emo girl 2
Paste as a new layer
Re size
Position
Add DS
Open bunny
Paste as a new layer
Re size
Position
Add DS
Open the blue bag
Paste as a new layer
Re size
Position
Add DS
Open the blue flower
Paste as a new layer
Re size
Position
Add DS
Open the pink flower
Paste as a new layer
re size
Position
Add DS
Open the black crown
Paste as a new layer
Re size
Position
Add DS
Open blue glitter
Paste as a new layer
Move to the bottom
Add DS
Open pink and blue swirls
Paste as a new layer
Re size
Position
Add DS
Open pink winged heart
Paste as a new layer
Re size
Position
Add DS
Open pink and black ribbon
Paste as a new layer
Re size
Position
Add DS
Open the black bottle cap
Paste as a new layer
Re size
Position
Add DS
Open pink poison
Paste as a new layer
Re size
Position
Add DS
Open blue sneaker
Paste as a new layer
Re size
Position
Add DS
Open pink skateboard
Paste as a new layer
Re size
Position
Add DS
Open skull 3
Paste as a new layer
Re size
Position
Add DS
Open blue voodoo face
Paste as a new layer
Re size
Position
Add DS
Open blue twisted Pin
Paste as a new layer
Re size
Position
Add DS
Open paper 5
Paste as a new layer
Apply mask
Merge group
Add all © info
Add your name
Eye Candy Glass
gradient glow
Add DS
I added some noise to her hair and skull
I used Uniform 50,51, & 52
If you don't animate
Merge visible
Save as a PNG!
Subscribe to:
Posts (Atom)
Stay Away


About Me
- Brooke
- Hello! My name is Brooke! I am from Southern Louisiana.SAHM to 3 kids and married to my best friend.I have been PSPing since Oct 2010 and loving every second of it! I love learning new things and being creative. Also a special thanks to Sue Ellen from Wicked Creationz Scraps for teaching me how to PSP!! Love you lots Sue :)
My Blinkies


Protected

Awards


Stores


My Fav Blogs


I CT For


My Blog List


Dork Sistaz


