Monday, November 21, 2011

This tutorial was written for experienced PSP users
Supplies:
Scrap kit by Designs by Sarah at SATC called Christmas Tradition here
Artwork by Elias Chatzoudis at PTE here
This tube was a gift from PTE for Christmas, Thanks a lot!
Font is called Carpenter Script
Plug in Eye Candy 6
New image 600x600
Open frame 1
Paste as a new layer
Re size
Position
Click inside the frame using your magic wand
Expand by 3
Open paper 7
Paste as a new layer
Selections Invert Delete Select None
Add DS to your frame
Open your tube
Paste as a new layer
Re size
Position
Add DS
Open and paste these elements along with a DS:
Bells
Christmas Bag
Branch 1 2 & 3
Fireplace
Holly
Christmas Balls
Snowman
Wreath Frame
Add all © info
Add your name
Eye Candy Glass
Gradient Glow
Add DS
Merge visible
Save as PNG!


This tutorial was written for experienced PSP users
Supplies:
Scrap kit by Toxic Desirez called Emo Candy here
Artwork by Martin Abel at CDO here
Font is called Elise
Plug in Eye Candy 6
New image 600x600
Open frame 2
Paste as a new layer
Re size
Position
Click inside using your magic wand
Expand by 3
Open paper 16
Paste as a new layer
Selections invert Delete Select None
Add DS to your frame
Open your tube
Paste as a new layer
Re size
Position
Add DS
Open and paste these elements along with a DS:
Sparkles
Star Chain
Butterfly
Web
Splatter
Word Art
Pill
Candy 3
Lollipops
Bow 5
Candy 4
Cupcake
Wire
Beaded String
Fuzzy Emo
Add all © info
Add your name
Eye Candy Glass
Gradient Glow
Add DS
Merge visible
Save as PNG!

Monday, November 14, 2011

I used a kit from KittzKreationz Call An Abominal Christmas!!
You can find the kit here and lots of other awesome FTU kits!!
Thanks Kittz!!

Thursday, November 10, 2011

This tutorial was written for EXPERIENCED psp users
Supplies:
Scrap kit called Lovely Autumn by Lizquis Scraps here
Artwork by Elias Chatzoudis at PTE here
I purchased this tube from MPT when he sold there
Font is called Designers
Plug in Eye Candy 6
Open frame 1
Paste as a new layer
Re size
Position
Click inside using your magic wand
Expand by 2
Open paper 5
Paste as a new layer
Selections Invert Delete Select None
Add DS to your frame
Open your tube
Paste as a new layer
Re size
Position
Add DS
Open and paste these elements along with a DS:
Carritilla
Apples
Pumpkin
Scarecrow
Owl
Leaves
Flowers
Acorn
Butterfly
Add all © info
Add your name
Eye Candy Glass
Gradient Glow
Add DS
Merge visible
Save as PNG!

Monday, November 7, 2011

This tutorial was written for EXPERIENCED psp users
Supplies:
Scrap kit by Stef's Scrapkits at SATC here
Artwork by VeryMany exclusively at SATC here
Font is called Pea Nae Nae
Plug in Eye Candy 6
New Image 600x600
Open frame 2
Paste as a new layer
Re size
Position
Click inside your frame using your magic wand
Expand by 3
Open paper 12
Paste as a new layer
Selections invert Delete Select None
Add DS to your frame
Open your tube
Paste as a new layer
Re size
Position
Add DS
Open and paste these elements along with a DS:
E 7
E 27
E 11
E 8
E 12
E 28
E 38
Add all © info
Add your name
Eye Candy Glass
Gradient Glow
Add DS
Merge visible
Save as PNG!

Sunday, November 6, 2011

This tutorial was written for EXPERIENCED PSP USERS
Supplies:
Scrap kit by Toxic Desirez called Camp Scare here
Artwork by Scott Blair at PTE here
Font is called radar_two
Plug in Eye Candy 6
New image 600x600
Open the spiked frame
Paste as a new layer
Re size
Position
Click inside the frame using your magic wand
Expand by 3
Open paper 21
Paste as a new layer
Selections Invert Delete Select None
Add DS to your frame
Open your tube
Paste as a new layer
Re size
Position
Add DS
Open and paste these elements along with a DS:
Grass
Backpack
Bush
Cloud
Log
Knife
Boat
Blood Splatter
Sparkle
Tree 3
Add all © info
Add your name
Eye Candy Glass
Gradient Glow
Add DS
Merge visible
Save as PNG!

Thursday, November 3, 2011

This tutorial was written for experienced PSP users
Supplies:
Scrap kit called Harvest Of Memories by Creative Scraps by Crys here
Mask is one of mine from Set 6 called Spiral
Font is called Pea Ashley Rose
Plug in Eye Candy 6
New image 600x600
Open E 30
Paste as a new layer
Re size
Position
Add DS
Open the girl
Paste as a new layer
Re size
Position
Add DS
Open and paste these elements along with a DS:
E 11
E 12
E 13
E 4
E 15
E 16
E 29
E 28
E 31
E 32
E 33
E 3
Open paper 2
Paste as a new layer
Apply Mask
Merge group
Add any © info
Add your name
Eye Candy Glass
Gradient Glow
Add DS
Merge visible
Save as PNG!

Thank You Rieka Rafita for my new blog design!!! Awesome as ALWAYS!! Be sure to stop by her to store and get your blog design today!!

Monday, October 31, 2011
Hello everyone!! Umm lately I have been getting a lot of bad reviews about a blog makeover I won for the Blog Hop by Dark Angelz..... Everyone is telling me this and that about her and well I never new until now and I don't think it's a good idea to keep my makeover the way it is now b/c I guess it is making me look bad.But anyways, lol I am having my blog re-done by the Fabby Rieka Rafita soo everyone please bare with me until she can get it done...48 hours :)

Wednesday, October 26, 2011

This tutorial was written for experienced PSP users
Supplies:
Scrap kit by Addictive Pleasures called Trick or Treat here
Template by Addictive Templates here
Artwork by the fabby Elias Chatzoudis at PTE here
I purchased this tube from MPT when he sold there
Font is called Misfits
Plug in Eye Candy 6
Open the template
Delete the © layer
Add noise to your frame layers
Add Eye Candy Gradient Glow to your layers
Add DS to your layers
Open your tube
Paste as a new layer over your square
Select the square
Selections Select all Float De float
Activate your tube
Selections Invert Delete Select None
Change blend mode to Hard light
Add DS to your frame
Repeat this step with the other two squares using different blend modes
Open your tube again
Paste as a new layer
Position
Add DS
Open and paste these elements along with a DS:
Candy Bucket
Eye ball
Lights
Candy Apple
Cupcake 3
Dangle
Glass
Boo
Button
Candy
Lollis
Sparkles
Ribbon bow 2
Add all © info
Add your name
Add your name
Eye Candy Glass
Gradient Glow
Add DS
Merge visible
Save as PNG!

Tuesday, October 25, 2011

This tutorial was written for experienced PSP users
Supplies:
Scrap kit called Winifred by Addictive Pleasures here
Artwork by Elias Chatzoudis at PTE here
Template by Punky Butts here
Font is called BankGothic Md BT
Plug in Eye Candy 6
Open your temp
Delete the © layer & the white rectangle and words
Use papers 2 & 9
Open your closeup
Paste as a new layer over the rectangle
Click on your square
Selections Select all Float De float
Click on your tube
Selections Invert Delete Select none
Change Blend mode to Luminance Legacy
Add noise to the frame and add a DS
Repeat this step for the other 2 squares
Open your full body tube
Paste as a new layer
Position
Add DS
Open and paste these elements along with a DS:
Cat 3
Cauldron
Eyeball
Labels 1 & 2
Web
Slime
Bow 4
Pumpkin
Spider 2
Stars
Light
Bat
Ribbon
Sparkles
Add all © info
Add your name
Eye Candy Gradient Glow
Add DS
Merge visible
Save as PNG!


This tutorial was written for experienced PSP users
Supplies:
Scrap kit by Toxic Desirez called Silly Monsters here
Font is called Thought Zest
Mask 1 by Vix here
Plug in Eye Candy 6
New image 600x600
Open frame 2
Paste as a new layer
Re size
Position
Click inside using your magic wand Expand by 3
Open paper 14
Paste as a new layer
Selections Invert Delete Select None
Add DS to your frame
Open monsters 1-4
Paste as a new layer
Re size
Arrange
Add DS
Open and paste these elements along with a DS:
Candy Stick
Zombie Girl
Bow 1
Word Art 1
Candy corn
Cupcake 1
Eye ball
Kitty w/Skull
Lolli 1&2
String
Wire
Sparkles
Splatter
Spider
Open paper 3
Paste as a new layer
Apply Mask
Merge group
Add all © info
Add your name
Eye Candy Glass
Gradient Glow
Add DS
Merge visible
Save as PNG!

Thanks to Dark Angel Designz for giving me this fabby blog makeover that I won for the Blog Hop 2011!

Saturday, October 22, 2011

This tutorial was written for experienced PSP users
Supplies:
Scrap kit called Dark Night If The Witch by A Taggers Scrap here
Artwork by Elias Chatzoudis at PTE here
Font is called Scriptina Pro
Mask of choice
Plug in Eye Candy 6
New image 600x600
Open the fence
Paste as a new layer
Re size
Position
Add DS
Open your tube
Paste as a new layer
Re size
Position
Add DS
Open and paste these elements along with a DS:
Dead Ivy
Dead grass
Witches House
Witches Goods
Ghost 4
Cauldron 2
Book 3
Flames
Pumpkin Cluster
Skull Stack
Tree 1 & 2
Bottles
Ghostly Light
Open paper 12
Paste as a new layer
Apply Mask
Merge group
Add all © info
Add your name
Add your name
Eye Candy Glass
Gradient Glow
Add DS
Merge visible
Save as PNG!

Friday, October 21, 2011

This tutorial was written for experienced PSP users
Supplies:
Scrap kit by Toxic Desirez called Hot Mummy here
Template by Creative By Nature here
Artwork by Arthur Crowe at PTE here
Font is called Pea Whitney Rae
Plug in Eye Candy 6
Open your template
Delete the © layer
Use papers 1 3 4 15 & 21
Add DS and gradient glow to your layers
Add Eye Candy glass to your word art & DS
Open your closeup
Paste as a new layer over the rectangle
Activate the rectangle
Selections Select All Float De float
Activate the tube layer
Selections Invert Delete Select None
Change blend mode to Luminance Legacy
Repeat this step with the other rectangle
Open your full body tube
Paste as a new layer
Position
Add DS
Open and paste these elements along with a DS:
Bat
Skulls
Spider Web
Mummy
Bow 2
Eyeball
Wordart
Lolli 1 2 & 3
Ribbon 1
Splatter
Add all © info
Add your name
Add noise
Add DS
Merge visible
Save as PNG!

Saturday, October 15, 2011

This tutorial was written for experienced PSP users
Supplies:
Scrap kit called Halloween Babe 2 by Addictive Pleasures here
Artwork by Barbara Jensen here
Template by Tina's Magical Scrap World here
Font is called Satisfaction
Plug in Eye Candy 6
Open your template
Delete the © layer, pixel words on the quads and the 4 single quadrants
Delete the © layer, pixel words on the quads and the 4 single quadrants
Use papers 7 & 12
Open your closeup
Paste as a new layer over the rectangle
Activate the rectangle layer
Selections Select All Float De Float
Select tube
Selections Invert Delete Select None
Change blend mode to Luminance Legacy
Repeat this step for the other rectangle
Open your full tube
Paste as a new layer
Position
Add DS
Open and paste these elements along with a DS:
Pumpkin cat
Cat
Moon
Decor
Sign
Flask
Bottle
Glass
Skull Candle
Skull Spider
Witch Hat
Sparkle
Add all © info
Add your name
Add your name
Add noise
Add DS
Merge visible
Save as PNG!

Thursday, October 13, 2011


This tutorial was written for experienced PSP users
Supplies:
Scrap kit called Hot Az hell by Toxic Desirez here
Artwork by Screaming Demons at Scraps and the City here
Template by AngiRique here
Plug in Eye Candy 6
Font is Inspiration
Open your template
Delete The © layer
Use papers 2 8 & 16
Add Eye Candy Glass to the word art
Open your tube
Paste as a new layer
Re size
Position
Add DS
Open and paste the elements along with a DS:
Bow 4
Silhouette
Beaded String
Lollipop 2
Rose
Spider Skull
Word Art
Sparkles
Add all © info
Add your name
Add Noise
Add DS
Merge visible
Save as PNG!

Wednesday, October 12, 2011

This tutorial was written for experienced PSP users
Supplies:
Scrap kit by Addictive Pleasures called Farmers Girl here
Artwork by Keith Garvey at PTE here
I purchased this tube from MPT when Elias sold there
Font is called Inspiration
Mask of choice
Plug in Eye Candy 6
New image 600x600
Open the frame
Paste as a new layer
Re size
Position
Click inside using your magic wand
Expand by 3
Open paper 6
Paste as a new layer
Selections Invert Delete Select None
Add DS to your frame
Open your tube
Paste as a new layer
Re size
Position
Add DS
Open and paste these elements along with a DS:
Berries
Blossom 2
Leaf
Candles
Bow 2
Broom
Apple
Corn
Fork
Scarecrow
Wheel
Open paper 12
Paste as a new layer
Apply Mask
Merge group
Add all © info
Add your name
Eye Candy Glass
Gradient Glow
Add DS
Merge visible
Save as PNG!

Monday, October 10, 2011

This tutorial was written for experienced PSP users
Supplies:
Scrap kit called Thriller by A Taggers Scrap here
Artwork by VeryMany at PFD here
Font and mask of choice
Plug in Eye Candy 6 for the name
New image 600x600
Open frame 2
Paste as a new layer
Click inside the frame with your magic wand
Expand by 3
Open paper 12
Paste as a new layer
Selections Invert delete Select None
Add DS to your frame
Open and paste these elements along with a DS:
Bloody Hand
Bloody Hand
Blood
Cob Web
Hour Glass
Moon
Tree
Stump
Bleeding element
Ribbon 2
Sparkle
Open paper 6
Paste as a new layer
Apply Mask
Merge Group
Add all © info
Add your name
Eye Candy Glass
Gradient Glow
Add DS
Merge visible
Save as PNG!

Saturday, October 8, 2011

This tutorial was written for experienced PSP users:
Supplies:
Scrap kit called Karma by Toxic Desirez here
Template by Missy which is available at the Creative Misfits Forum here
Artwork by Arthur Crowe at PTE here
Font is called Mandigo
Plug in Eye Candy 6
Open your template
Use papers 1 2 3 4 18 & 24
Open your tube
Paste as a new layer over under frame 1
Activate the paper below your frame
Selections Select all Float De float
Click on your tube
Selections Invert Delete Select none
Change blend mode to multiply
Add DS
Repeat this step for the other 2 frames
Add DS to your frames and a white gradient Glow to your temp layers
Open and paste these elements along with a DS:
Word art
Lollipops
Candy
Butterfly
Flowers
Sparkle
Glitter splatter
Add all © info
Add your name
Eye Candy Glass
Gradient Glow
Add DS
Merge visible
Save as PNG!

Thursday, October 6, 2011

This tutorial was written for experienced PSP users
Supplies:
Scrap kit called Noire et Beige by Sky Scraps
And the tube also!!!
You can purchase these items from Scraps and The City here
Mask is from Staci which you can only get from the Creative Misfits Blog here
Font is called PFChampionScript Pro
Plug in Eye Candy 6
New image 600x600
Open heart frame
Paste as a new layer
Re size
Position
Click inside the frame using your magic wand
Expand by 3
Open paper 1
Paste as a new layer
Selections Invert Delete Select None
Add DS to your frame
Open and paste your tube
Re size
Position
Add DS
Open and paste these elements along with a DS:
E 30
E 20
E 21
E 18
E 49
E 95
E 96
E 16
Open paper 5
Paste as a new layer
Apply Mask
Merge group
Add all © info
Add your name
Eye Candy Glass
Gradient Glow
Add DS
Merge visible
Save as PNG!

Subscribe to:
Posts (Atom)
Stay Away


About Me
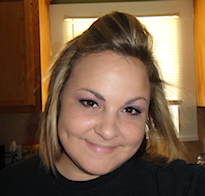
- Brooke
- Hello! My name is Brooke! I am from Southern Louisiana.SAHM to 3 kids and married to my best friend.I have been PSPing since Oct 2010 and loving every second of it! I love learning new things and being creative. Also a special thanks to Sue Ellen from Wicked Creationz Scraps for teaching me how to PSP!! Love you lots Sue :)
My Blinkies


Protected

Awards


Stores


My Fav Blogs


I CT For


My Blog List


Dork Sistaz


